Development, Dynamics CRM, Software, Technology

First look at Microsoft Dynamics CRM 2011 – installation

Well, the next release of Microsoft Dynamics CRM is already out. In fact, it was released to customer download on 16th February – a month back. Here’s the press release and if you need to download a 90-day trial version you can do so here. The trial keys can also be found on the download page.

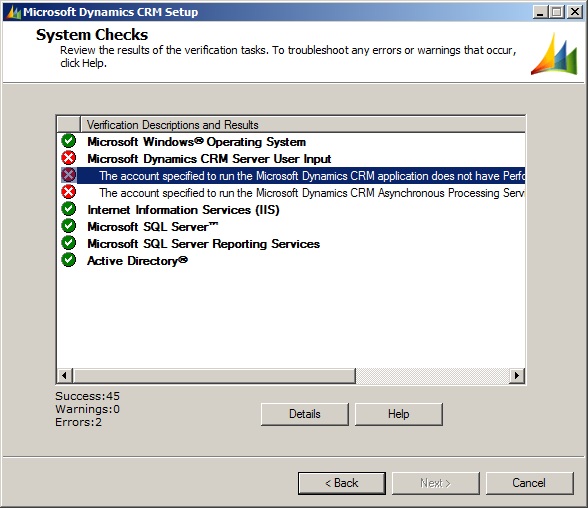
I’ve just finished an installation of the new version on Windows Server 2008 R2 64-bit using SQL Server 2008 R2 64-bit. It went smoothly with just one hiccup. I had selected domain accounts for running all the CRM services (make sure you select a different account for the Microsoft Dynamics CRM Sandbox Processing Service service than the rest or else you will encounter a warning that asks you to do so). On the System Checks step, where the setup verifies the selected settings against the environment, it threw two warnings under Microsoft Dynamics CRM Server User Input. The warnings were –

  • The account specified to run the Microsoft Dynamics CRM application does not have performance counter permissions
  • The account specified to run the Microsoft Dynamics CRM Asynchronous Processing Service does not have performance counter permissions

Here’s a screenshot –

This issue can be resolved by simply adding your service account to the local group Performance Log Users. To do this follow the steps below (do not close the CRM setup window, leave it as it is on the warnings step) –

  1. Open Start -> Administrative Tools -> Computer Management.
  2. Navigate to System Tools -> Local Users and Groups -> Groups.
  3. Select the group Performance Log Users, right-click on it and select Add to Group...
  4. Click on the Add button to select your service account.
  5. Click on the OK button when done.

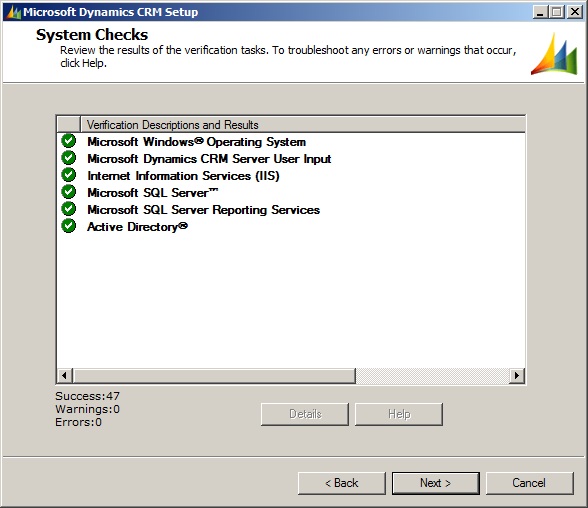
Back in the Dynamics CRM installation window, click on the Back button and then on the Next button. The setup will verify the settings again, and this time you should not see any warnings.

When you open CRM, you will be surprised – the user interface has undergone major enhancements and there are a lot of important new features. But, more about them in later posts…

Just one more thing, the other relevant downloads are here –

Development, Dynamics CRM, Software, Technology

Dynamics CRM 4 – Fixing query timeout issues with views

A few days back, the default views for a couple of entities in one of our Dynamics CRM 4 instance failed to open. The most notable was the “Active Contacts” view on the Contact entity. The same view continued to open properly on all other deployments. In fact, we had imported the organization from another instance of Dynamics CRM and the views were opening on the original instance. Below is the error that we were receiving. There’s nothing that could be deduced from it, other than something was failing.

The first step to troubleshoot was to enable tracing on the CRM instance. To do that, you have to make a few registry entries. The details are outlined here. The registry setting of TraceEnabled, TraceDirectory, and TraceRefresh are required. We, however, found out that even after setting the TraceDirectory, our trace logs were created in the default C:\Program Files\Microsoft Dynamics CRM\Trace directory. Maybe, the path is to be provided in a specific format, but that is yet to be investigated. Here is a view of our registry settings –

Once, the setting was done, the trace files generation started and we started getting files with names of the format ServerName-w3wp-wwwroot-yyyymmdd-X. The trailing X stands for the file number generated for a single day, and will typically have a value of 1. If you set the TraceFileSizeLimit registry flag, then each file will have a maximum size limit, and multiple files (with trailing 1,2,3…and so on) may get created for a single day.

We tried to open the culprit view again to have the trace generated. This is what we received in the log file –

[2011-02-02 04:04:51.8] Process: w3wp |Organization:f79g217f-763c-e045-ah72-895056hgyy76 |Thread: 9 |Category: Platform.Sql |User: s45g217f-333d-sddd-ehd2-643877rehh44 |Level: Error | BusinessProcessObject.ExecuteQuery
>Exception when executing query: select top 51 contact0.Telephone1 as 'telephone1', contact0.EMailAddress1 as 'emailaddress1', contact0.CreatedBy as 'createdby', contact0.LastName as 'lastname', contact0.FirstName as 'firstname', contact0.JobTitle as 'jobtitle', contact0.ContactId as 'contactid', contact0.CreatedByYomiName as 'createdbyyominame', contact0.CreatedByDsc as 'createdbydsc', contact0.CreatedByName as 'createdbyname' from Contact as contact0 where (contact0.StateCode = 0 and (contact0.DeletionStateCode in (0))) order by contact0.FirstName asc, contact0.ContactId asc Exception: System.Data.SqlClient.SqlException: Timeout expired. The timeout period elapsed prior to completion of the operation or the server is not responding.
at System.Data.SqlClient.SqlConnection.OnError(SqlException exception, Boolean breakConnection)
at System.Data.SqlClient.TdsParser.ThrowExceptionAndWarning(TdsParserStateObject stateObj)
at System.Data.SqlClient.TdsParser.Run(RunBehavior runBehavior, SqlCommand cmdHandler, SqlDataReader dataStream, BulkCopySimpleResultSet bulkCopyHandler, TdsParserStateObject stateObj)
at System.Data.SqlClient.SqlDataReader.ConsumeMetaData()
at System.Data.SqlClient.SqlDataReader.get_MetaData()
at System.Data.SqlClient.SqlCommand.FinishExecuteReader(SqlDataReader ds, RunBehavior runBehavior, String resetOptionsString)
at System.Data.SqlClient.SqlCommand.RunExecuteReaderTds(CommandBehavior cmdBehavior, RunBehavior runBehavior, Boolean returnStream, Boolean async)
at System.Data.SqlClient.SqlCommand.RunExecuteReader(CommandBehavior cmdBehavior, RunBehavior runBehavior, Boolean returnStream, String method, DbAsyncResult result)
at System.Data.SqlClient.SqlCommand.RunExecuteReader(CommandBehavior cmdBehavior, RunBehavior runBehavior, Boolean returnStream, String method)
at System.Data.SqlClient.SqlCommand.ExecuteReader(CommandBehavior behavior, String method)
at System.Data.SqlClient.SqlCommand.ExecuteDbDataReader(CommandBehavior behavior)
at System.Data.Common.DbCommand.System.Data.IDbCommand.ExecuteReader()
at Microsoft.Crm.CrmDbConnection.InternalExecuteReader(IDbCommand command)
at Microsoft.Crm.CrmDbConnection.ExecuteReader(IDbCommand command, Boolean impersonate)
at Microsoft.Crm.BusinessEntities.BusinessProcessObject.ExecuteQuery(CrmDbConnection dbConnection, IDbCommand command, ISqlExecutionContext context)

Please note that your GUIDs for the organization and user will be different from the ones specified above. The important line is the one highlighted in red. It specifies the query that failed to run at the SQL Server (again, your query may be different in case you have customized the view) and the exception thrown – Exception: System.Data.SqlClient.SqlException: Timeout expired. The timeout period elapsed prior to completion of the operation or the server is not responding. This clearly says that the query is taking a long time to execute and it timed out. We connected to the CRM organization database using SQL Server Management Studio and ran the query to find out the execution time. It was taking around 51 seconds to execute. It turned out that the default query execution timeout for CRM is 30 seconds. We ran the same query on other CRM instances and it ran within 5 seconds. So, that was why the views were opening on all other instances. The timeout values can be overridden by two registry settings OLEDBTimeout and ExtendedTimeout. In our case, since it was simply views (ExtendedTimeout is used for long running operations – imports & other stuff), we just needed to add the OLEDBTimeout registry setting. We set its value to 120 seconds and the view started working. You can see the detailed steps here (although the KB article refers to another problem, the steps in the Resolution section are for adding the timeout registry settings).

You can use this approach to fix timeout issues immediately, however for a more sustainable and long-term approach, the database indexes & query execution plans need to be looked at.

Development, Dynamics CRM, Software, Technology, Uncategorized

Dynamics CRM 4 – Add a Deployment administrator using SQL

A couple of days back, someone accidentally removed the sole user added to the Deployment Administrators on one of our Dynamics CRM 4 installations. There was no way that we could access the Deployment Manager console. So, we decided to look into the CRM SQL Server database for a way to add a user as a Deployment Administrator. Since, all Dynamics CRM configuration (metadata & data) is stored in the MSCRM_CONFIG and other tenant specific databases we had a hunch that it should be possible. Furthermore, since the Deployment Administrators users are common to the entire CRM deployment (as opposed to any specific tenant) we figured out that we should look only into the MSCRM_CONFIG database.

Although the investigation lasted for quite some time (with a lot of tense moments), the solution proved to be very easy & swift.

Here’s what needs to be done –

  1. In Dynamics CRM, navigate to Settings -> Administration -> Users and open the user whom you want to be added to the Deployment Administrator. In the window that opens for the user, look at the URL. It should be something like this –

    http://MyCRM/MyTentant/biz/users/edit.aspx?id={A GUID Here}
    The GUID that you see in the URL is the CRMUserId for the user account. Select this GUID and copy it (Ctrl + C).

  2. Open Microsoft SQL Server Management Studio, and connect to the MSCRM_CONFIG database for your CRM installation. Open a new query window, and run the following query to retrieve a few identifiers for your user account.

    SELECT Id, UserId
    FROM [MSCRM_CONFIG].[dbo].[SystemUserOrganizations]
    WHERE CrmUserId = 'Your CRMUserId here'

    Note down the Id and the UserId returned in this query.

  3. Now, we simply need to add a row to the SystemUserRoles table for this user, using the Id and UserId returned. The User role that we need to assign so that a user can act as a Deployment Administrator is Administrator with the GUID of 19cfbc8d-77ed-459e-9909-1bf1cc1b0430. You can get this information from the SecurityRole table. Use the following query to do add the required row –

    INSERT INTO [MSCRM_CONFIG].[dbo].[SystemUserRoles]
    ([Id], [SecurityRoleId], [SystemUserId], [UniqueifierId], [IsDeleted])
    VALUES
    ('Your Id returned above', '19cfbc8d-77ed-459e-9909-1bf1cc1b0430',
    ,'Your UserId returned above', NULL, 0)

    That’s it. This should do the trick.

    Verify the changes by opening Deployment Manager now…

Development, Dynamics CRM, Software, Technology

Restore system generated picklist values in Dynamics CRM 4.0

If you ever happened to delete a system generated picklist value, which was in use earlier, you may run into issues with adding new instances of that entity, synchronizing offline data from the Outlook client and quite a lot of other things, as data exists that uses the deleted value of that picklist. System generated picklist values usually start from 1 and are set incrementally. If you try to add that value again, CRM will not allow you, as you can only add values equal to or greater than 200,000. Values below that number are reserved for backward & forward compatibility as well as for other languages.

As a practice, the system generated picklist values should never be deleted, as you can not restore them later with the CRM user interface directly. And if you happen to, there are a few solutions, depending upon your situation –

  • Restore the CRM database – you can get all your picklist values back by restoring the most recent backup of your organization’s CRM database. However, this may be the least feasible option as a lot of data might have been added or updated in your CRM database after the last backup.
  • Export & import the entity customizations – using the CRM interface, you can export customizations for the affected entity, make the necessary changes in the resulting xml file, and import the customizations back again. Here’s how to –
    1. Go to the Customization menu of the Settings panel, and click on Export Customizations. This will show you the list of entities on your CRM.
    2. Select the entity that has the picklist attribute that we want to restore. Click on Export Selected Customizations button at the top of the list. You will get a prompt that informs you about the customizations that the export will include. Click on the OK button on that prompt.
    3. The customizations are generated as XML and archived in a .zip file (customizations.zip). The browser will prompt you to save that file. Save it to your local drive and extract the XML file inside.
    4. Open the XML file in any text editor. Search for your picklist with its attribute name. You should see sub-elements that specify the options (values) for that picklist –

      <options>
      <option value="200000">
      <labels>
      <label description="Value 1" languagecode="1033" />
      </labels>
      </option>
      <option value="200001">
      <labels>
      <label description="Value 2" languagecode="1033" />
      </labels>
      </option>
      <option value="200002">
      <labels>
      <label description="Value 3" languagecode="1033" />
      </labels>
      </option>
      <option value="200003">
      <labels>
      <label description="Value 4" languagecode="1033" />
      </labels>
      </option>
      <options>

      You may see different values for the languagecode XML attribute depending upon your language settings. However, the point here is to either edit or add an <option> element with the value that you earlier had. For example you could edit the option 200000 above to a value of 1 like this –

      <option value="1">
      <labels>
      <label description="Value 1" languagecode="1033" />
      </labels>
      </option>

      You need to add or modify so that all you earlier picklist values are now in the list. I would recommend to add as that will ensure any data that was added after you deleted the picklist values also maintains its integrity.

    5. Save the file and go to the Customizations menu of the Settings panel.
    6. Click on Import Customizations, browse to the edited file and click on Upload. The entity will get listed. Click on Import Selected Customizations on the top of the list and click OK on any dialogs that crop up. Your earlier picklist values should now be restored and all your synchronizations should work fine.
  • Update the CRM database directly – this is an unsupported way of restoring the values and should only be done if you are completely aware of the process, and comfortable with using SQL queries on the CRM database. In any case, you should back up the CRM database before proceeding. Open up SQL Server Management Studio and connect to the CRM database with SQL Server Administrative privileges. The organization metadata is stored in a schema named METADATASCHEMA on the SQL Server organization database. You can get a list of entities by querying in the METADATASCHEMA.Entity table. You have to look out for the EntityId of your entity.
    You can get it by a query like –

    SELECT * FROM METADATASCHEMA.Entity WHERE LogicalName = 'Your_Entity_Name' (replace Your_Entity_Name by the name of your entity)

    OR
    SELECT * FROM METADATASCHEMA.Entity WHERE ObjectTypeCode = 100 (replace 100 by the object type code of your entity.)

    Then, you can filter the METADATASCHEMA.Attribute table by the value of the EntityId column in the above query like this –

    SELECT * FROM METADATASCHEMA.Attribute WHERE LogicalName = 'Your_Attribute_Name' AND EntityId = 'Your_Entity_Id' (replace Your_Attribute_Name by the name of your picklist attribute and Your_Entity_Id by the value of the EntityId column in the earlier query)

    The value of the AttributeId is what you need for the further queries.

    You can get the current (and old) picklist values from the METADATASCHEMA.AttributePicklistValue table like this –

    SELECT * from METADATASCHEMA.AttributePicklistValue WHERE AttributeId = 'Your_Attribute_Id' (replace Your_Attribute_Id with the value of the AttributeId column in the earlier query)

    Here you will see all picklist values, old and new. You can locate the current values by looking at the Value and CustomizationLevel columns. You have to choose to modify certain values which are active and you have added (which means they will have a value of 200,000 or greater). This is because you can always add a value of 200,000 or above later from the CRM interface. In other words, the trick is to update the existing value to system generated picklist values less than 200,000 (which you can not do from the CRM interface) and later add the required 200,000 (and above) values from the CRM interface. The value of the column AttributePicklistValueId is what you need as the key for the UPDATE statement.

    Your query will look like –

    UPDATE METADATASCHEMA.AttributePicklistValue SET Value = 1 WHERE AttributePicklistValueId = 'Your_AttributePicklistValueId'
    (replaced Your_AttributePicklistValueId with the value of your AttributePicklistValueId in the earlier query and 1 with the system generated picklist value you wish to set).

    We are not done yet! There is one more table to update – you need to do a matching update in the dbo.StringMap table. This is where your current values are stored. You can use a query like –

    UPDATE dbo.StringMap SET AttributeValue = 1 WHERE ObjectTypeCode = 100 AND AttributeName = 'Your_Attribute_Name' AND AttributeValue = 200000 AND LangId = 1033
    (replace 1 with the system generated picklist value you wish to set, Your_Attribute_Name with the name of your attribute, 200000 with the current picklist value you can modify and LangId with the language code. You can remove the LangId filter if you are using only one language.)

    That’s it. If you go and check the picklist values in the CRM interface now, you should see the values you have updated in the last query. Now, make sure you change the names as per your requirement as well as add the new values (which will be 200000 or greater) so that recent data does not lose integrity. Restructuring in this way does not cause problems as picklists are referred in actual data by their values and not the GUID of the values in the metadata. So, as long as the picklist has a particular value with the expected name everything should work fine!

.NET, Development, Dynamics CRM, Software, Technology

Development using the Microsoft CRM 4.0 SDK (4.0.12)

For an integration project involving implementation of a service-oriented abstraction layer for our Dynamics CRM (4.0), we have been using the new Microsoft CRM 4.0 Software Development Kit (version 4.0.12). The SDK provides powerful features that can be utilized for almost any development aspect related to Dynamics CRM.

The most exciting part of the SDK is the inclusion of the Advanced Developer Extensions that is being called Microsoft xRM. It uses ADO.NET and simplifies a lot of complex tasks. You will get a development experience similar to the ADO.NET Entity Framework with Microsoft xRM. There’s good documentation that comes with the SDK, and one can get started quickly.

The few things that we found really useful –

  1. Connection management to CRM is greatly simplified. You can connect using a single line of code. The information required is stored in the <connectionStrings> section of your app.config or web.config file. To initiate a connection to a CRM instance, you just need to pass the name of the corresponding connection string as a parameter for the constructor of the CRMDataContext class. The DataContext class (derived from CRMDataContext) provides for all connection management to the CRM instance.
  2. There is a packaged command-line utility called crmsvcutil.exe that can generate strongly typed classes for the CRM entities. It even generates classes for all custom entities and attributes. This is great, since it allows the Microsoft xRM to work in ORM fashion.
  3. Using LINQ to query CRM is now possible, and that opens up interesting possibilities. The query results can be used for data binding on ASP.NET pages. Also, there are inbuilt DataSource controls that can make the querying task trivial.
  4. It is possible to combine static entities (one generated using crmsvcutil.exe) and dynamic ones (without generated code) in the same operation. So, you have the flexibility to fine-tune your code whenever required.

The SDK can be downloaded from here.

Development, EAI, Scribe, Software, Technology

Adventures in Scribing – CRM & ERP Integration

The past couple of weeks have seen me (and the entire team) “Scribing” at work!

For an upcoming project involving CRM & ERP integration, we are using Scribe Insight 6.5.2 (from ScribeSoft). Scribe does offer a low-cost, quick rollout solution to enterprise integration, however, it does come with quite a few limitations. We are struggling with getting along with the single integration target constraint (quite a few of our integration processes need synchronization with multiple systems at one go, while Scribe only allows for one destination in an integration task – however, I learn that Scribe 7.0 is round the corner with multiple targets!). The obvious alternative is to use Microsoft Biztalk Server, however, the costs, expertise & infrastructure involved would be much higher than with Scribe. So, for now, Scribe seems to be the best choice.

Our integration is primarily to three ends:

1) Microsoft Dynamics CRM 4.2.x – the Dynamics CRM Adapter 1.1 that comes with Scribe seems to be fit for most of the work

2) Oracle EBS – this is where we are into uncharted territory. Scribe doesn’t have an adapter for Oracle EBS, although it does support Oracle databases. I haven’t seen anyone use Scribe for integrating with Oracle ERP yet.

3) All other systems – we are building web-service based interfaces for the rest to be able to use the Scribe Web Services adapater 1.1. This also seems to work pretty well.

The latest problem we seem to have hit is with Scribe picking up messages in MSMQ at random, and not in any specific order.

Even with the myriad minor issues cropping all over, it looks like Scribe is certainly going to save us a lot of development effort & cost. And we will be waiting for Scribe Insight 7.0 with great expectations…